On the Net

|Main Blog|Yearning|  

Words of God


About Linux News and OpenSource


and below are my posts....


Monday, October 18, 2010

Creating a restriction on sending to a particular user or group

Requirement:

email / group email: test_group001@mydomain.com
Allowed on to send on this mail is only good.user@yahoo.com


Setup:

1. Existing working smtp postfix server.

Needed configs:


1. mkdir /etc/postfix/global_restriction
2. create a file /etc/postfix/global_restriction/global_group_allowed
#/etc/postfix/global_restriction/global_group_allowed
#entry for that file:
good.user@yahoo.com OK

3. create a file /etc/postfix/global_restriction/global_group_restriction
#/etc/postfix/global_restriction/global_group_restriction
#entry for the file below:
test_group001@ class_allowed_to_send_to_global_group

4. Create a restriction class at /etc/postfix/main.cf

Below should exist on that file:

smtpd_recipient_restrictions =
check_recipient_access hash:/etc/postfix/global_restriction/global_group_restriction
permit_mynetworks
#premit my network should be under check_recipinet_access so it will not allow thus sender with network

smtpd_client_restrictions =
check_recipient_access hash:/etc/postfix/global_restriction/global_group_restriction
permit_mynetworks


smtpd_restriction_classes = class_allowed_to_send_to_global_group
class_allowed_to_send_to_global_group = check_sender_access hash:/etc/postfix/global_restriction/global_group_allowed, reject


5. After creating, postmap all related file and postfix reload

Friday, October 19, 2007

Making your ssh server to act as a gateway by port forwarding

Ok, this is quick. My objective is to access the web, webmin and ssh of serverX. See below the text diagram.


[My Linux desktop]<-->[Routers]<-->[ssh server]<-->[routers]<-->[serverX]


Here's how.

-Create a file named config inside your $HOME/.ssh/

#.ssh/config
User root
LocalForward 20000 10.9.2.6:80
LocalForward 22000 10.9.2.6:22
LocalForward 20001 10.9.2.6:10000

I'm accessing as root, and the IP Add is the IP of serverX, you may put the hostname if you have it on you host file or dns. Ok, when finished on the file, if I connect to the ssh server..

[root@my desktop ~]# ssh -l root ssh-server
root@ssh-server's password:
[root@ssh-server ~]#

After able to established an ssh connection, on my local terminal, those ports listed on the file will open.

tcp 0 0 127.0.0.1:20000 0.0.0.0:* LISTEN 26163/ssh
tcp 0 0 127.0.0.1:20001 0.0.0.0:* LISTEN 26163/ssh
tcp 0 0 127.0.0.1:22000 0.0.0.0:* LISTEN 26163/ssh
tcp 0 0 127.0.0.1:46279 127.0.0.1:22000 ESTABLISHED 26166/ssh
tcp 0 0 127.0.0.1:22000 127.0.0.1:46279 ESTABLISHED 26163/ssh
tcp 0 0 127.0.0.1:40487 127.0.0.1:20000 TIME_WAIT -
tcp 0 0 ::1:20000 :::* LISTEN 26163/ssh
tcp 0 0 ::1:20001 :::* LISTEN 26163/ssh
tcp 0 0 ::1:22000 :::* LISTEN 26163/ssh

Then you can just access those locally and you are going to be connected to the serverX via ssh. If you wish to access serverX web server, just open a the your browser with url

http://127.0.0.1:20000

or if you wish to open the webmin, then type

http://127.0.0.1:20001


Note: Don not dis engaged your ssh connection to the ssh server, else you wont be able to connect on those 2xxxx ports.

Well, its not an original trick, just found those by searching, I just need to compile for future reference.


Thanks.

Monday, October 01, 2007

VNC Server on Mandriva 2007

Accessing Mandriva desktop remotely via vncviewer.

-Install x11vnc via urpmi.
-Generate vnc password, use the command vncpasswd command, it can be done as a user.
-Lunch VNC server as a user from cli, use the command

x11vnc -usepw

the -usepw command option allows the remote user to enter a password to access via VNCViewer. Thus the password that you assign using the vncpasswd command should be use.

Logs generated by the command above when running it on the foregorund.

snip...

raw_fb: (nil)
fake_fb: (nil)

01/10/2007 02:31:54 setting up 32 cursors...
01/10/2007 02:31:54 done.
01/10/2007 02:31:54
01/10/2007 02:31:54 Autoprobing TCP port
01/10/2007 02:31:54 Autoprobing selected port 5900
01/10/2007 02:31:54 Xinerama: disabling: display does not support it.
01/10/2007 02:31:54 created 32 tile_row shm polling images.
01/10/2007 02:31:54 fb read rate: 10 MB/sec
01/10/2007 02:31:54 screen setup finished.
01/10/2007 02:31:54
The VNC desktop is: mandrivadesktop001:0
PORT=5900


Followed by a log when someone made a connection remotely then disconnects.


01/10/2007 02:34:02 Got connection from client 10.10.9.7
01/10/2007 02:34:02 other clients:
01/10/2007 02:34:02 Disabled X server key autorepeat.
01/10/2007 02:34:02 to force back on run: 'xset r on' (3 times)
01/10/2007 02:34:02 created xdamage object: 0x3800024
01/10/2007 02:34:02 Client Protocol Version 3.5
01/10/2007 02:34:02 Protocol version sent 3.5, using 3.5
01/10/2007 02:34:06 Pixel format for client 10.10.9.7:
01/10/2007 02:34:06 16 bpp, depth 16, little endian
01/10/2007 02:34:06 true colour: max r 31 g 63 b 31, shift r 11 g 5 b 0
01/10/2007 02:34:06 no translation needed
01/10/2007 02:34:06 rfbProcessClientNormalMessage: ignoring unsupported encoding type zlibhex
01/10/2007 02:34:06 Using compression level 9 for client 10.10.9.7
01/10/2007 02:34:06 Enabling X-style cursor updates for client 10.10.9.7
01/10/2007 02:34:06 Enabling full-color cursor updates for client 10.10.9.7
01/10/2007 02:34:06 Enabling cursor position updates for client 10.10.9.7
01/10/2007 02:34:06 Using image quality level 0 for client 10.10.9.7
01/10/2007 02:34:06 Enabling LastRect protocol extension for client 10.10.9.7
01/10/2007 02:34:06 Enabling NewFBSize protocol extension for client 10.10.9.7
01/10/2007 02:34:06 Using tight encoding for client 10.10.9.7
01/10/2007 02:34:11 client_count: 0
01/10/2007 02:34:11 Restored X server key autorepeat to: 1
01/10/2007 02:34:11 viewer exited.
01/10/2007 02:34:11 deleted 32 tile_row polling images.


Peace!

Friday, September 21, 2007

Quick TimeZone setting on Centos

This is a quick way of setting timezone on Centos Box, this may be similar on other distro or may differ a little, but I have to put it here for future reference.

HowTo:
It can be done as root


cd /etc

If you hava a localtime file on /etc, you may just have to rename it. Then after renaming, do the command below:

ln -sf /usr/share/zoneinfo/Asia/Manila localtime

Here, I'm setting the time to Manila or Philippines Time Zone, or you may select particular timezone inside /usr/share/zoneinfo/

Ciao!

Tuesday, August 21, 2007

Authenticating Linux to Active Directory

I will describe here joining a Linux Centos 4.4 host to Windows 2003 Active Directory.

Files to consider

/etc/samba/smb.conf
/etc/krb5.conf
/etc/pam.d/system-auth

Package that should be installed:

samba-common
samba (samba-server)
krb5-libs

My Configuration files:
/etc/samba/smb.conf

#/etc/samba/smb.conf
[global]

workgroup = mydomain
realm = MYDOMAIN.COM
netbios name = linuxhost
security = ads
encrypt passwords = yes
log file = /var/log/samba/%m.log
log level = 2
max log size = 50
socket options = TCP_NODELAY SO_RCVBUF=8192 SO_SNDBUF=8192
winbind separator = +
idmap uid = 10000-20000
idmap gid = 10000-20000
winbind enum users=yes
winbind enum groups=yes
template homedir = /home/%D/%U
template shell = /bin/bash
winbind use default domain = yes


/etc/krb5.conf

[logging]
default = FILE:/var/log/krb5libs.log
kdc = FILE:/var/log/krb5kdc.log
admin_server = FILE:/var/log/kadmind.log

[libdefaults]
default_realm = mydomain.com
dns_lookup_realm = true
dns_lookup_kdc = true
ticket_lifetime = 24h
forwardable = yes
default_tgs_enctypes = DES-CBC-CRC DES-CBC-MD5 RC4-HMAC
default_tkt_enctypes = DES-CBC-CRC DES-CBC-MD5 RC4-HMAC
preferred_enctypes = DES-CBC-CRC DES-CBC-MD5 RC4-HMAC

[realms]
mydomain.com = {
kdc = srvad01.mydomain.com:88
admin_server = 192.168.1.10:749
default_domain = mydomain.com
}

MYDOMAIN.COM = {
}

[domain_realm]
# .example.com = EXAMPLE.COM
example.com = mydomain.com

[kdc]
profile = /var/kerberos/krb5kdc/kdc.conf

[appdefaults]
pam = {
debug = false
ticket_lifetime = 36000
renew_lifetime = 36000
forwardable = true
krb4_convert = false
}


And the most important entry is the

/etc/pam.d/system-auth


#%PAM-1.0
# This file is auto-generated.
# User changes will be destroyed the next time authconfig is run.
auth required /lib/security/$ISA/pam_env.so
auth sufficient /lib/security/$ISA/pam_unix.so likeauth nullok
auth sufficient /lib/security/$ISA/pam_winbind.so use_first_pass
auth required /lib/security/$ISA/pam_deny.so

account required /lib/security/$ISA/pam_unix.so broken_shadow
account sufficient /lib/security/$ISA/pam_succeed_if.so uid < 100 quiet
account [default=bad success=ok user_unknown=ignore] /lib/security/$ISA/pam_winbind.so
account required /lib/security/$ISA/pam_permit.so

password requisite /lib/security/$ISA/pam_cracklib.so retry=3
password sufficient /lib/security/$ISA/pam_unix.so nullok use_authtok md5 shadow
password sufficient /lib/security/$ISA/pam_winbind.so use_authtok
password required /lib/security/$ISA/pam_deny.so

session required pam_mkhomedir.so skel=/etc/skel/ umask=0022
session required /lib/security/$ISA/pam_limits.so
session required /lib/security/$ISA/pam_unix.so


Ok, Dont forget to change the mydomain.com to the legitimate domain name of your AD and the srv01.mydomain.com to the hostname of AD.

Also make sure that you have an Administrator or Domain admin rights on that AD since it is required when joining the domain.


After having those files on your host, try to restart the ff: by the command.


/etc/init.d/winbind restart
/etc/init.d/smb restart


I know there are other command to do that, it just how I did it.


Then, to join to the domain or AD, issue the command


net ads join -U adminstrator@MYDOMAIN.COM


the there should be similar message that should appear upon joining. see below

[root@gw1 ~]# net join -U administrator@MYDOMAIN.COM
administrator@MYDOMAIN.COM's password:
[2007/08/21 00:50:37, 0] libads/ldap.c:ads_add_machine_acct(1368)
ads_add_machine_acct: Host account for linuxhost already exists - modifying old account
Using short domain name -- MYDOMAIN
[2007/08/21 00:50:37, 0] libads/kerberos.c:get_service_ticket(335)
get_service_ticket: kerberos_kinit_password LINUXHOST$@MYDOMAIN.COM@MYDOMAIN.COM failed: Preauthentication failed
Segmentation fault


Opssss, troubleshooting....
What I did was removing the files at /var/cache/samba/
command:

rm -rf /var/cache/samba/*

then issue again the command "net ads join"

[root@gw1 ~]# net join -U administrator@MYDOMAIN.COM
administrator@MYDOMAIN.COM's password:
[2007/08/21 00:51:04, 0] libads/ldap.c:ads_add_machine_acct(1368)
ads_add_machine_acct: Host account for linuxhost already exists - modifying old account
Using short domain name -- MYDOMAIN
Joined 'LINUXHOST' to realm 'MYDOMAIN.COM'

Now it joined successfully.


Issue the command "getent passwd" and it should display all the users registered on your AD

Tuesday, August 29, 2006

Adding my existing Centos Box to also authenticate to my LDAP Server

Ok, since I can now authenticate to my LDAP Server from my Mandriva box, I want to add the existing Centos Box that acted as a fileserver and dial-in server to authenticate to the same LDAP Server.

On the Centos Box, I have the following package installed:

openldap-2.2.13-4
nss_ldap-226-10
compat-openldap-2.1.30-4
openldap-clients-2.2.13-4

On this box, I dont have X running so all the configuration is via CLI. To start with, I open the konsole, log as root then run authconfig, when prompted on something, make sure to enable ldap authentication method.. see image...


ok, on my box, after doing that, It should automatically touch and modified /etc/nsswitch.conf but it did'nt (or maybe I'm wrong), so I manually modified that /etc/nsswitch.conf


passwd: files ldap
shadow: files ldap
group: files ldap


I added the word ldap after the word files, so I can retain the machine to still login using the local users, incase the ldap server is not available.

Below are my working config files, which also allows ldap users to change their own password using the command passwd:

/etc/pam.d/system-auth


#%PAM-1.0
# This file is auto-generated.
# User changes will be destroyed the next time authconfig is run.
auth required /lib/security/$ISA/pam_env.so
auth sufficient /lib/security/$ISA/pam_unix.so
auth sufficient /lib/security/$ISA/pam_ldap.so likeauth nullok use_first_pass
auth required /lib/security/$ISA/pam_deny.so

account required /lib/security/$ISA/pam_unix.so broken_shadow
account sufficient /lib/security/$ISA/pam_succeed_if.so uid < 100 quiet
account sufficient /lib/security/$ISA/pam_ldap.so
#account [default=bad success=ok user_unknown=ignore] /lib/security/$ISA/pam_ldap.so
account required /lib/security/$ISA/pam_permit.so

password requisite /lib/security/$ISA/pam_cracklib.so retry=3
password sufficient /lib/security/$ISA/pam_unix.so nullok use_authtok md5 shadow
password sufficient /lib/security/$ISA/pam_ldap.so use_authtok
password required /lib/security/$ISA/pam_deny.so

session optional /lib/security/$ISA/pam_mkhomedir.so skel=/etc/skel/ umask=0022
session required /lib/security/$ISA/pam_limits.so
session required /lib/security/$ISA/pam_unix.so
session optional /lib/security/$ISA/pam_ldap.so


and my /etc/pam.d/passwd file


#%PAM-1.0
#auth required pam_stack.so service=system-auth
#account required pam_stack.so service=system-auth
#password required pam_stack.so service=system-auth
password sufficient pam_ldap.so
password required pam_unix.so nullok obscure min=4 max=8


and my /etc/ldap.conf


#I'm using stunnel, so the value of host should be localhost
host 127.0.0.1
base dc=duriancity,dc=dvo
ldap_version 3
scope one
pam_filter objectclass=posixaccount
pam_login_attribute uid
pam_member_attribute gid
pam_password crypt
nss_base_passwd dc=duriancity,dc=dvo?sub
nss_base_passwd ou=People,dc=duriancity,dc=dvo?one
nss_base_shadow dc=duriancity,dc=dvo?sub
nss_base_group dc=duriancity,dc=dvo?sub
ssl no


and create the file /etc/stunnel/stunnel.conf


chroot = /home/stunnel
pid = /stunnel.pid
setuid = stunnel
setgid = stunnel
#configure logging
debug = 7
output = /var/log/messages
#client mode
client = yes
#Service level config
[ldap]
accept = 389
connect = 172.16.0.250:636


then create the user stunnel and then lock that user

To test if its working, issue the command


getent passwd


It should display the ldap users together with other existing local users

Friday, August 11, 2006

LDAP Authentication server for Linux Users - basics

The scenario:

1. Setup an OpenLDAP server for Central authentication of Linux Users.

2. Let users change their password from client PC using the normal passwd command

3. The LDAP server resides at Centos Box

4. The client PCs are mandriva, or mix later
-------------------------------------------------

1. Install and Setup OpenLDAP server on Centos.

the following openldap packages installed on my Centos BOX


openldap.i386 2.2.13-4 installed
openldap-clients.i386 2.2.13-4 installed
openldap-devel.i386 2.2.13-4 installed
openldap-servers.i386 2.2.13-4 installed


Files and folders to remember
- /etc/openldap/slapd.conf - configuration files
- /etc/ldap.conf - clients conf file
- /usr/share/openldap/migration/ - migration tools here
- /var/lib/ldap/ - default location where the dtabase be installed

Now on my system, I install LDAP via yum, so it uses the RPM package of Centos.

Here's the contents of my /etc/openldap/slapd.conf


#
# See slapd.conf(5) for details on configuration options.
# This file should NOT be world readable.
#
include /etc/openldap/schema/core.schema
include /etc/openldap/schema/cosine.schema
include /etc/openldap/schema/inetorgperson.schema
include /etc/openldap/schema/nis.schema
#
#Define ACL
#include /etc/openldap/slap.acl.conf
# Allow LDAPv2 client connections. This is NOT the default.
allow bind_v2
#
loglevel 296
pidfile /var/run/slapd.pid
argsfile /var/run/slapd.args
#
#Below allows users to change their own password
access to attr=userPassword
by self write
by anonymous auth
by dn.base="cn=ldapadmin,dc=duriancity,dc=dvo" write
by * none
access to *
by self write
by dn.base="cn=ldapadmin,dc=duriancity,dc=dvo" write
by * read
#
database ldbm
suffix "dc=duriancity,dc=dvo"
rootdn "cn=ldapadmin,dc=duriancity,dc=dvo"
rootpw {SSHA}pgsjjjklsfghrrhh53644fhmd85utuegjH3NM+DJH569XZc
#
#The duriancity.dvo directory had been manually created then changed its ownership to ldap
directory /var/lib/ldap/duriancity.dvo
#
#RW file mode defined
mode 0600
# Indices to maintain for this database
index objectClass,uid,uidNumber,gidNumber,memberUid eq
#
#End of Config File


Generating the rootpw:

Open a konsole then issue the command as root:


[root@linux-ldap-server ~]# slappasswd
New password:
Re-enter new password:
{SSHA}pgsjjjklsfghrrhh53644fhmd85utuegjH3NM+DJH569XZc


Then make sure ldap run as a service.

chkconfig ldap on

then start the service

/etc/init.d/ldap start


by default, it should listen to port 389
---------------------------------------------------------

Some basic explanation:

-loglevel = 296 - logging level is set to 296, which equals 8 + 32 + 256 (got this from Oreilly Book)
Defination:
8 - Connection management
32 - Search filter processing
256 - Statistics for connection, operations, and results


OpenLDAP Logging levels Table
Level Information recorded
-1 All logging information
0 No Logging information
1 Trace function calls
2 Packet-handling debugging information
4 Heavy trace debugging
8 Connection management
16 Packets sent and received
32 Search filter processing
64 Configuration file processing
128 Access control list processing
256 Statistics for connection, operations, and results
512 Statistics for results returned to clients
1024 Communication with shell backends
2048 Print entry parsing debug information


then append

local4.debug /var/log/slapd.log

on the file

/etc/syslog.conf

and by that, you can view the logs by the command, as root:
tail -f /var/log/slapd.log


-cn=ldapadmin - it could be any name, root, admin, but the default is Manager

-rootpw - the value could be generated by the command slappasswd

Now, I need to create an ldif file for duriancity.dvo, below is the format


#/etc/openldap/duriancity.dvo.ldif
dn: dc=example,dc=com
dc: example
description: Root LDAP entry for example.com
objectClass: dcObject
objectClass: organizationalUnit
ou: rootobject

dn: ou=People, dc=example,dc=com
ou: People
description: All people in organisation
objectClass: organizationalUnit
#-------------------------------


then add or import it on ldap database by the command below:


ldapadd -x -D "cn=ldapadmin,dc=duriancity,dc=dvo" -W -f /etc/openldap/duriancity.dvo.ldif


Now, I will add a group ldaptestusers and a user ldapuser1002 which is a member of ldaptestusers group.
-----------------------------------------------------------------


[root@cicdavao ~]# groupadd -g 10700 ldaptestusers

[root@cicdavao ~]# useradd -u 10505 -g ldaptestusers ldapuser1002

[root@cicdavao ~]# passwd ldapuser1002
Changing password for user ldapuser1002.
New UNIX password:
Retype new UNIX password:
passwd: all authentication tokens updated successfully.


Now I have to migrate the ldaptestusers group and ldapuser1002 and import it to ldap database


[root@cicdavao ~]# grep ldaptestusers /etc/group
ldaptestusers:x:10700:

[root@cicdavao ~]# grep ldaptestusers /etc/group > /etc/openldap/ldaptestusers.group.tmp

[root@cicdavao ~]# /usr/share/openldap/migration/migrate_group.pl /etc/openldap/ldaptestusers.group.tmp > /etc/openldap/ldaptestusers.group.ldif

[root@cicdavao ~]# cat /etc/openldap/ldaptestusers.group.ldif
dn: cn=ldaptestusers,ou=Group,dc=duriancity,dc=dvo
objectClass: posixGroup
objectClass: top
cn: ldaptestusers
userPassword: {crypt}x
gidNumber: 10700

[root@cicdavao ~]# ldapadd -x -D "cn=ldapadmin,dc=duriancity,dc=dvo" -W -f /etc/openldap/ldaptestusers.group.ldif
Enter LDAP Password:
adding new entry "cn=ldaptestusers,ou=Group,dc=duriancity,dc=dvo"

[root@cicdavao ~]# grep ldapuser1002 /etc/passwd
ldapuser1002:x:10505:10700::/home/ldapuser1002:/bin/bash

[root@cicdavao ~]# grep ldapuser1002 /etc/passwd > /etc/openldap/ldaptestuser1002.passwd.tmp

[root@cicdavao ~]# /usr/share/openldap/migration/migrate_passwd.pl /etc/openldap/ldaptestuser1002.passwd.tmp > /etc/openldap/ldaptestuser1002.passwd.ldif

[root@cicdavao ~]# cat /etc/openldap/ldaptestuser1002.passwd.ldif
dn: uid=ldapuser1002,ou=People,dc=duriancity,dc=dvo
uid: ldapuser1002
cn: ldapuser1002
sn: ldapuser1002
mail: ldapuser1002@duriancity.dvo
objectClass: person
objectClass: organizationalPerson
objectClass: inetOrgPerson
objectClass: posixAccount
objectClass: top
objectClass: shadowAccount
userPassword: {crypt}$1$Hl8WW1s8$tKiKrYmOT/Vy6G9yitrLp/
shadowLastChange: 13371
shadowMax: 99999
shadowWarning: 7
loginShell: /bin/bash
uidNumber: 10505
gidNumber: 10700
homeDirectory: /home/ldapuser1002

[root@cicdavao ~]# ldapadd -x -D "cn=ldapadmin,dc=duriancity,dc=dvo" -W -f /etc/openldap/ldaptestuser1002.passwd.ldif
Enter LDAP Password:
adding new entry "uid=ldapuser1002,ou=People,dc=duriancity,dc=dvo"


-----------------------------------------------------

After doing the above, I have now an ldapuser1002 which had been already exported at the ldap database. It should now be able to login at the client assuming its been properly configured to auth to ldap server.

Now here's my ldap.conf on the ldap server:


#/etc/ldap.conf
host 127.0.0.1
base dc=duriancity,dc=dvo
ssl no
tls_cacertdir /etc/openldap/cacerts
pam_password md5
#------------------


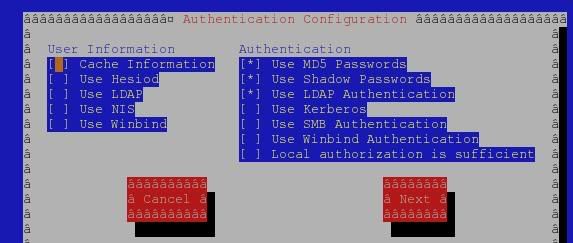
Now, configuring the client PC which is Mandriva LE 2005 and 2006

On my Box, I open up a console then run


Drakauth


as root, then select LDAP and enter the necessary info, which are:

server and base DN

Here's my /etc/ldap.conf on my Mandriva Box acting as client, I just deleted the lines that has been commented out.


host 172.16.0.253
#host 127.0.0.1
# The distinguished name of the search base.
base dc=duriancity,dc=dvo

# The LDAP version to use (defaults to 3
# if supported by client library)
ldap_version 3

# The port.
# Optional: default is 389.
#port 389

# The search scope.
#scope sub
scope one
#scope base

# Search timelimit
#timelimit 30

# Filter to AND with uid=%s
pam_filter objectclass=posixaccount

# The user ID attribute (defaults to uid)
pam_login_attribute uid

# Group member attribute
pam_member_attribute gid

pam_password crypt

nss_base_passwd dc=duriancity,dc=dvo?sub
nss_base_passwd ou=People,dc=duriancity,dc=dvo?one
nss_base_shadow dc=duriancity,dc=dvo?sub
nss_base_group dc=duriancity,dc=dvo?sub

# OpenLDAP SSL mechanism
# start_tls mechanism uses the normal LDAP port, LDAPS typically 636
#ssl start_tls
ssl off


and my /etc/pam.d/system-auth and /etc/pam.d/passwd


#/etc/pam.d/system-auth
#%PAM-1.0

auth required pam_env.so
auth sufficient pam_unix.so
auth sufficient pam_ldap.so likeauth nullok use_first_pass
auth required pam_deny.so

account sufficient pam_unix.so
account sufficient pam_ldap.so use_first_pass
account required pam_deny.so

password required pam_cracklib.so retry=3 minlen=2 dcredit=0 ucredit=0
password sufficient pam_unix.so nullok use_authtok md5 shadow
password sufficient pam_ldap.so
password required pam_deny.so

session optional pam_mkhomedir.so skel=/etc/skel/ umask=0022
session required pam_limits.so
session required pam_unix.so
session optional pam_ldap.so
#--------------------------------------


#/etc/pam.d/passwd
password sufficient pam_ldap.so
password required pam_unix.so nullok obscure min=4 max=8
#--------------------------------------


and here's also my /etc/nsswitch.conf, very imortant file that for the system to look for ldapserver for authentication...


#
# /etc/nsswitch.conf
#
# An example Name Service Switch config file. This file should be
# sorted with the most-used services at the beginning.
#
# The entry '[NOTFOUND=return]' means that the search for an
# entry should stop if the search in the previous entry turned
# up nothing. Note that if the search failed due to some other reason
# (like no NIS server responding) then the search continues with the
# next entry.
#
# Legal entries are:
#
# nisplus or nis+ Use NIS+ (NIS version 3)
# nis or yp Use NIS (NIS version 2), also called YP
# dns Use DNS (Domain Name Service)
# files Use the local files
# db Use the local database (.db) files
# compat Use NIS on compat mode
# hesiod Use Hesiod for user lookups
# [NOTFOUND=return] Stop searching if not found so far
#

# To use db, put the "db" in front of "files" for entries you want to be
# looked up first in the databases
#
# Example:
#passwd: db files nisplus nis
#shadow: db files nisplus nis
#group: db files nisplus nis

passwd: files ldap nisplus
shadow: files ldap nisplus
group: files ldap nisplus

#hosts: db files nisplus nis dns
hosts: files nisplus nis dns

# Example - obey only what nisplus tells us...
#services: nisplus [NOTFOUND=return] files
#networks: nisplus [NOTFOUND=return] files
#protocols: nisplus [NOTFOUND=return] files
#rpc: nisplus [NOTFOUND=return] files
#ethers: nisplus [NOTFOUND=return] files
#netmasks: nisplus [NOTFOUND=return] files

bootparams: nisplus [NOTFOUND=return] files

ethers: files
netmasks: files
networks: files
protocols: files
rpc: files
services: files

netgroup: nisplus

publickey: nisplus

automount: files ldap nisplus
aliases: files nisplus


By the above config, assuming that no firewall related problem, the ldapusers are able to login from the MandrivaBox either using KDE or via konsole...

ex..


[ken@nixbox ~]$ su ldapuser1002
Password:
Creating directory '/home/ldapuser1002'.
bash-3.00$ id
uid=10505(ldapuser1002) gid=10700(ldaptestusers) groups=10700(ldaptestusers)
bash-3.00$ passwd
Changing password for user ldapuser1002.
Enter login(LDAP) password:
New password:
Re-enter new password:
LDAP password information changed for ldapuser1002
passwd: all authentication tokens updated successfully.
bash-3.00$


The above shown that ldapusers1002 been able to log using su command from mandriva Box that has been properly configured to auth to Ldap Server.

The user also been able to use the passwd util and change its own LDAP passsword from the Mandriva Box.

Basically Basics :D , no SSL or TLS or even stunnel yet..


I really need to post how I did it because I'll have to repeat the process on my other machine, maybe on later time, I'll become more familiar on other implementation of OpenLDAP.


Update - Configuring stunnel


On the client box which is Mandriva

1. Install stunnel, as root do the ff:


urpmi stunnel

http://anorien.csc.warwick.ac.uk/mirrors/Mandrakelinux/official/2005/i586/media/main/stunnel-4.07-1mdk.i586.rpm
installing stunnel-4.07-1mdk.i586.rpm from /var/cache/urpmi/rpms
Preparing... #############################################
1/1: stunnel #############################################
To build a new pem, execute the following OpenSSL command:
openssl req -new -x509 -days 365 -nodes -config /usr/share/doc/stunnel-4.07/stunnel.cnf -out /etc/ssl/stunnel/stunnel.pem -keyout /etc/ssl/stunnel/stunnel.pem


2. Create a user named stunne with home /home/stunnel


useradd -d /home/stunnel stunnel


3. Edit stunnel.conf, on Mandriva, the stunnel.conf should be place to /etc/ssl/stunnel/ dir. Below is my stunnel.conf, by creating it manually.


chroot = /home/stunnel
pid = /stunnel.pid
setuid = stunnel
setgid = stunnel

#configure logging
debug = 7
output = /var/log/messages

#client mode
client = yes

#Service level config
[ldap]
accept = 389
connect = 172.16.0.254:636
#172.16.0.254 here is my ldapserver


Then edit also /etc/ldap.conf, make it listen to localhost


# Your LDAP server. Must be resolvable without using LDAP.
#host 172.16.0.254
host 127.0.0.1
# The distinguished name of the search base.
base dc=duriancity,dc=dvo


I change the listening host to 127.0.0.1 or localhost from its original ip. The traffic here that passes to port 389 has been redirected to 636 via secure tunnel.

4. start stunnel with the command below


stunnel


5. Then make it start as the pc boot. Edit /etc/rc.d/rc.local and append below


/usr/sbin/stunnel


6. Log can be check by the command


tail -f /var/log/messages


or if how its been defined on the stunnel.conf file.


On the Server side

1. Create also a user named stunnel

2. Install stunnel if not yet installed.

3. Edit the stunnel.conf file, default config dir is /etc/stunnel/ and below are the contents on my Box.


chroot = /home/stunnel/
pid = /stunnel.pid
setuid = stunnel
setgid = stunnel
debug = 7
output = /var/log/messages
#
client = no
cert = /usr/share/ssl/certs/stunnel.pem
key = /usr/share/ssl/certs/stunnel.pem
#
[ldap]
accept = 636
connect = 389


3. Change dir to /usr/share/ssl/certs/ and issue the command below..


make stunnel.pem


4. Modify permission on stunnel.pem


chmod 640 stunnel.pem && chgrp stunnel stunnel.pem


5. start stunnel


stunnel


6. Then make it run as the pc Boot by putting it on the file /etc/rc.d/rc.local


/usr/sbin/stunnel


7. Logfile, same as above...


References:

http://www.erikberg.com/notes/auth.html
http://ldots.org/ldap/
http://www.openldap.org/doc/admin23/slapdconfig.html#Configuration%20File%20Example
http://www.oreilly.com/catalog/ldapsa/
http://www.saas.nsw.edu.au/solutions/ldap.html

Thursday, July 20, 2006

Mounting NFS and SAMBA shares with AutoFS

I have a Linux PC serving files via SAMBA and NFS and a M$ PC that also shares files over the network, then other Linux desktop pc are accessing files on it. Some are accessing it regularly and some are as they need it only. The first solution that I did was to mount those shares statically, as those workstations boot, thus shared files should be mounted automatically on them so users should at anytime they open the shortcuts on their desktop, they can open it immediately.

What I did was, I included thus entries on the fstab of each Linux PC so that immediately, shares are mounted automagically after the desktop loads, but the problem, in case that thus PC's that holds the share were not yet turned on, of course, the mounting should fail. The setup here with regards to PC, are to turn them off after office hours, then turn them on again in the morning by the utility in-charge. So, if that person turns on that PC that holds shared folder later than thus Linux worstations who serves as clients, mounting error will occur, when someone tries to open a shortcut file or folder that originally resides on remote PC, the system will hang, or strange things happen.

The fix, thus remote shared folder should be mounted dynamically, and if not in use, should unmount itself after the specified period of time, which can be resolve by using autofs.

Here's a litle desciprtion of autofs from its man file:


DESCRIPTION
autofs control the operation of the automount(8) daemons running on the
Linux system. Usually autofs is invoked at system boot time with the
start parameter and at shutdown time with the stop parameter. The aut-
ofs script can also manually be invoked by the system administrator to
shut down, restart or reload the automounters.

OPERATION
autofs will consult a configuration file /etc/auto.master (see
auto.master(5)) to find mount points on the system. For each of those
mount points a automount(8) process is started with the appropriate
parameters. You can check the active mount points for the automounter
with the /etc/init.d/autofs status command. If the auto.master configu-
ration file contains a line of the form


Ok, at this point, I will assume that thus PC's that serves files either from M$ Windows or Linux via NFS or SamBA works well, without problem on sharing files. What to do now is just to configure autofs to behave as how you want it to be.

Install autofs package if not yet been installed then make it run as a service. On Mandriva, it can be installed by the command as root:


urpmi autofs


then

chkconfig autofs on


will make autofs run as a service.

The main conf file is auto.master as been mentioned on its description/operation by its man page. On my system, which is Mandriva, this is how I do it:

First, I created a folder under /mnt with a name, say.. nfs and smb.


mkdir /mnt/nfs


and


mkdir /mnt/smb


At the folder /mnt/nfs, these is whre the mounted nfs shares will be locates, so as with samba shares at /mnt/smb. By default, there is a file names /etc/auto.smb, and your might think that this is the conf file that shoul be used for mounting samba shares, it's not. What I did was just renaming that file and create another one. So below are my /etc/auto.nfs and /etc/auto.smb files.


windows -fstype=smbfs,username=user01,password=microshaft,uid=500,gid=500,dmask=555,fmask=444 ://192.168.1.1/C$
images -fstype=smbfs,username=user01,password=microshaft ://192.168.1.1/scannedfiles


Now, my /etc/auto.nfs file


fileserver -rw,hard,intr,rsize=8192,wsize=8192 192.168.1.2:/home/files
documents -ro,hard,intr,rsize=8192,wsize=8192 192.168.1.2:/mnt/hdb/files


and my /etc/auto.master file


/mnt/nfs /etc/auto.nfs -t=10
/mnt/smb /etc/auto.smb -t=10


Explanation:
On /etc/auto.smb file, line 1 contains a word windows,... onced a user envoked the command ls /mnt/smb/windows the shared //192.168.1.1/C$ will automatically being mounted under the folder /mnt/smb/windows and if you do a df command, you'll see something like this:


//192.168.1.1/C$ 24G 9.6G 14G 42% /mnt/smb/windows


which means that its been mounted already... and as been set on auto.master file, 10 seconds later, if there is no files being accessed on that folder, it will auto un-mount itself. Please take note, the I did not manually create a folder named /mnt/smb/windows, it will be just created dynamically by autofs once its being accessed. So same scenario would happen on NFS shared folde, once someone is accessing thus folder names being set on the /etc/auto.nfs files, same thing will happen.

Another take note
On Mandriva 2005 and 2006, there might be a bug on its own buid autofs package, since the system, though it could properly mount thus shared remote folder, but it wont un-mount itself after the specified duration when nothing has being done on the remote shared folder or files on it. The fix was, on mine, I installed the autofs from source which I got from kernel.org. By doing that, problem with auto un-mount has been resolved. The issue appear only on the mentioned 2005 and 2006, but on Mandrake 10.1 or on Centos and Xandros which both I'd tried, I did not encounter such problem.

Wednesday, July 12, 2006

First encounter with Asterisk Free PBX

Yesterday I started to try to install and Configure asterisk. Well, I dont have any digium fxs or fxo hardware yet so I'm toying with SIP Softphones. But before that, I manually installed asterisk on my already running Centos box, after installing some depedencies, I got it working. I installed it from CVS so that I have the latest version.

After reading some site that has lots of asterisk configuration sample, I manage to have a working SIP Softphone with the use of SJPhone. I did not made with Xlite with the same config, I dunno yet why it happend. On Xlite, when trying to call the registered prefix, it'll just sat call not allowed while on SJPhone, it allows even to its own number. Below are my sip.conf and extensions.conf with voicemail.conf.

/etc/asterisk/sip.conf


;;;;;;;;;;;;;;;;;;;;;;;;;;;;;;;;;;;;;;;;;;;;;;;;;;;;;;;;;;;;;
[general]
disallow=gsm
allow=ulaw
port = 5060 ; Port to bind to
bindaddr = 172.16.0.253 ; IP_Address to bind to
;context = from-sip ; Default for incoming calls
;;;;;;;;;;;;;;;;;;;;;;;;;;;;;;;;;;;;;;;;;;;;;;;;;;;;;;;;;;;;;
;---- My SIP Phone at my Desktop ----------;
[x1000]
type=friend
username=x1000
secret=1000
host=dynamic
defaultip=172.16.0.37
canreinvite=no
disallow=all
allow=all
context=testing
allow=ulaw
allow=alaw
;regexten=1000
nat=no
;
;;;;;;;;;; SIP Phone USer at other Desktop ;;;;;;;;;;
[x2000]
type=friend
username=x2000
secret=2000
host=dynamic
defaultip=172.16.0.30
canreinvite=no
disallow=all
allow=all
context=testing
allow=ulaw
allow=alaw
nat=no
;
;
;;; Entry for FXS Gateway - it has 4 FXS Ports but only configured 1 port
[4001]
type=friend
context=testing
secret=antek
host=dynamic
defaultip=172.16.0.254
nat=no
canreinvite=yes
dtmfmode=info
disallow=all
allow=ulaw
allow=g723.1
allow=g729
;
;---------- FXO VoIP Gateway Entry -------------
;By the entries below, the 4FXO antek Gateway will be able to call
;SIP users above.. by dialing the pstn number connected on its port
;then after a dial tone received, if for example 1000 has been dialed, x1000 SIP
;Phone will ring... in general, all numbers that has been set at extensions.conf
;should ring...
;
[3000]
type=friend
;username=3000
;secret=3000
host=dynamic
defaultip=172.16.0.252
canreinvite=no
disallow=all
allow=all
context=testing
allow=ulaw
allow=alaw
;regexten=2000
nat=no
;musicclass=classical
regexten=3000
;


/etc/asterisk/extensions.conf


;I'd just append the entries below to the sample
;extensions.conf file of asterisk 1.2
[testing]
;
exten => 1000,1,Dial(SIP/x1000, 10)
exten => 1000,2,VoiceMail(10001@testing, 10)
exten => 1000,3,PlayBack(vm-goodbye)
exten => 1000,4,HangUp()
exten => 999,1,VoiceMailMain(10001@testing)
;
exten => 3000,1,Dial(SIP/3000)
;exten => 3000,2,VoiceMail(10001@testing, 10)
;exten => 1000,3,PlayBack(vm-goodbye)
;exten => 1000,4,HangUp()
;exten => 999,1,VoiceMailMain(10001@testing)
;
exten => 2000,1,Dial(SIP/x2000) ;;//for user x2000
;
exten => 4001,1,Dial(SIP/4001)
;when dialing 4001, analog phone connected at the said antek fxs gateway should ring
;assuming properly configured..


and the voicemail.conf
/etc/asterisk/voicemail.conf


[testing]

x1000 => 1000, x1000, email@mymail.com

;the voicemail.conf is already an existing file, so I just added the above entry at the last line
;of this file


Ok, by default, the antek gateway has been set to H323, so VoIP protocol needs to be changed to SIP so it will be able to communicate with the asterisk SIP protocol. You can access the gateway via http or telnet for the configuration changes... here are some basics via http.

-
The model of the used gateway above.
-

-
SIP Configuration portion.. entries should match on the /etc/asterisk/sip.conf
-

-
Voice Processing control should be like that above... but you can actually used those other codecs since they are also being supported by asterisk.

For now, the config works fine, but still have so many features to discover..

Tuesday, June 27, 2006

Enabling the display of username and icons on kdm login - Mandriva 2005 & 2006

The default login screen for 2005LE and 2006 does not show user icons, and there appears to be no way to change this from the control center.

This is because there is a theme attached to the KDM login manager by default, which hides the icon display.

If you wish to re-enable it, you will need to edit file /etc/kde/kdm/kdmrc as root, and change the value for UseTheme from true to false.

On logging out of your KDE session, you should see a scrollable list of users with their icons.

You can add your own pictures to the list of available icons by placing them into directory /usr/share/mdk/faces. You will need root access to modify this directory, though.

originally posted by Sellis here

It actually takes me several hours on finding how to do it. Its hard to do accurate search if the keyword is not that accurate, so to be easily remember, added it here.


PEACE!

Thursday, June 22, 2006

Customizing error messages on my squid proxy

OK, my goal is to customize the error message that will appear once a request to the proxy server had been denied due to ACL.

On the entries inside the /etc/squid/squid.conf, thus that contains the ACL, an additional entry should be added. See example below.


##############
acl pornsites dstdomain -i "/etc/squid/blacklists/porn/domains"
deny_info ERR_PORNO pornsites
http_access deny pornsites
##############


Where pornosites is the name of the ACL and ERR_PORNO is the name of the customized error page. How? the ERR_PORNO file should be located inside the folder that contains all the default error pages of squid proxy, which is at /etc/squid/errors/ folder, well, I don't know with other system, but the one I am using is Centos 4.3 and squid was installed via yum.

Actually, I just copied the existing ERR_ACCESS_DENIED to ERR_PORNO and modified its content so that the message that will appear when a user tries to access a controled site contains messages that will fit to how the user should see it.

Another thing to consider, the default time generated by squid on its default error page has been set to GMT, so as you can see, the time looks like that below


Generated Thu, 22 Jun 2006 08:55:10 GMT


which does not correspond to the correct time, especially on the country I am located. So on the customized error page, I added the following entries on the last line of the file to correct that:

the line that contains Generated %t by %h (%s) controls the time and date, by default is uses %T which is for GMT so it was changed to small letter "t" and after doing that, this is how it looks:


Generated 22/Jun/2006:17:00:29 +0800


It is now displaying the local time of the Squid Proxy Server.

Remember that squid should be restarted for those changes to take effect.

Tuesday, May 30, 2006

Forcing user to change their password on their next log-on

I thought that on any linux distro, you can just issue the command below, as root of course..


passwd -e username


where username is the user you want to change its passwd on next logon. Very easy huh.. but hey, not all distro have that option, Mandriva, Redhat, Centos does not have that option on the "passwd" command. OpenSuse, Xandros, and SimplyMepis have that option, so you will see on the man page the -e option. So I thought that there is no way I could do that on the latter distros. I even post it on Mandriva and Centos users board, thinking that ther emight be a problem with my Mandriva box, maybe some package should be installed, but mine is just the same with their Mandy box. Then I got an answer from Centos board user (MarioT) about the alternative command:


chage -d 0 username


..the above command would do the same effect of the -e option of the command "passwd", thus forcing the user to change password on the next logon. If you want to look more, see the man page on your linux shell. Well, at least I could now force the users on my Mandriva Box to change passwd on their next logon just in case I need to assign a new one then for their privacy, let them change it on themselves. Honestly, I did'nt know the command "chage" would do the same... but now I know. Just showed that after years of using linux, am still a newbie.


Peace to all, hope they will find more survivor on Java Indonesia, as I write these, there are almost 5000 people declared dead.

May God Bless us all!

Thursday, March 30, 2006

My desktop as today 03302006 - Mandriva 10.2 Kde 3.4.2

Recovering and Changing Your MySQL Root Password

Sometimes you may have to recover the MySQL root password because it was either forgotten or misplaced. The steps you need are:

1. Stop MySQL: as root


service mysqld stop


2.Start MySQL in Safe mode with the safe_mysqld command and tell it not to read the grant tables with all the MySQL database passwords:


safe_mysqld --skip-grant-tables &
[1] 4815
Starting mysqld daemon with databases from /var/lib/mysql


3.Use the mysqladmin command to reset the root password. In this case, you are setting it to


thisisthepassword


mysqladmin -u root flush-privileges password "thisisthepassword"


4.Restart MySQL normally:


service mysqld restart
Stopping MySQL: 040517 09:39:38 mysqld ended
[ OK ]
Starting MySQL: [ OK ]
[1]+ Done safe_mysqld --skip-grant-tables


The MySQL root user will now be able to manage MySQL using this new password.

Classification of DS (Digital Signal)

This only serves as guide for those DS signal, sometime I forgot their respective bandwidth allocation, so here are the following:

(Digital Signal) A classification of digital circuits. The DS technically refers to the rate and format of the signal, while the T designation refers to the equipment providing the signals. In practice, "DS" and "T" are used synonymously; for example, DS1 and T1, DS3 and T3.

NORTH AMERICA, JAPAN, KOREA, ETC.

Voice
Service Channels Speed
DS0 1 64 Kbps
DS1 24 1.544 Mbps (T1)
DS1C 48 3.152 Mbps (T1C)
DS2 96 6.312 Mbps (T2)
DS3 672 44.736 Mbps (T3)
DS4 4032 274.176 Mbps (T4)

EUROPE (ITU)

Voice
Service Channels Speed (Mbps)
E1 30 2.048
E2 120 8.448
E3 480 34.368
E4 1920 139.264
E5 7680 565.148


SONET CIRCUITS


Service Speed (Mbps)
STS-1 OC1 51.84 (28 DS1s or 1 DS3)
STS-3 OC3 155.52 (3 STS-1s)
STS-3c OC3c 155.52 (concatenated)
STS-12 OC12 622.08 (12 STS-1s, 4 STS-3s)
STS-12c OC12c 622.08 (12 STS-1s, 4 STS-3c's)
STS-48 OC48 2488.32 (48 STS-1s, 16 STS-3s)

-
Info about OC
(Optical Carrier) The transmission speeds in SONET/SDH networks.


 SONET CIRCUITS

Optical Electrical
Channel Channel Speed (Mbps)

VT-1.5 1.7
OC-1 STS-1 51.84 (28 DS1s or 1 DS3)
OC-3 STS-3 155.52 (3 STS-1s)
OC-3c STS-3c 155.52 (concatenated)
OC-12 STS-12 622.08 (12 STS-1, 4 STS-3)
OC-12c STS-12c 622.08 (12 STS-1, 4 STS-3c)
OC-48 STS-48 2488.32 (48 STS-1, 16 STS-3)
OC-192 STS-192 9953.28 (192 STS-1, 64 STS-3)
OC-768 STS-768 39813,12 (768 STS-1, 256 STS-3)


OC = Optical Carrier
STS = Synchronous Transport Signal

Wednesday, March 29, 2006

Upgrading kde 3.3 to kde 3.4 on my Madriva 10.2

I've just upgraded my Kde 3.3 to Kde 3.4 on my Mandriva LE 2005. There are lots of ways to upgrade it, there are thacs RPM, SOS and the one that came from kde.org itself. I tried the kde package from kde.org, those RPMs that are precompiled for Mandriva LE 2005 or Mandriva 10.2. The package can be found here.

What I did was, downloaded all those package using wget.

wget -c -r -nd ftp://ftp.kde.org/pub/kde/stable/3.4.2/Mandriva/10.2/i586/


The command will download all the files on the directory where you issued the command. On my box, I made a directory kde3.4.2 under my users home dir then issue that command inside that directory and downloaded all the files on it. Then I added that directory as a local urpmi repository. The command would be (do it as root)..


urpmi.addmedia kde3.4.2 /home/usersdir/kde3.4.2


After doing this, I change my box to init 3, meaning no gui or X then remove all the package related to kde. Viewing what package are related to kde could be done by..


rpm -qa | grep kde


so you have a clue which to remove. Then after removing those, you can just type..


urpmi kdebase


and it then install the new kde. Not all will be install by doing that of course, so manually, we can add those kde applications that we needed via urpmi.


A little bit late huh!..

:)

Sunday, March 26, 2006

Playing MP3 on OpenSuse 10

OpenSuse 10 is very nice, comparing to other distro, this distro has a lot of package on its community edition CD that I can install on my home Box. The 5 CD that I downloaded has lots of OSS on it, but.. even if I was able to install Xmms and Amarok, it wont allow me to play MP3, since MP3 is not licensed to GPL. Support on MP3 is available only to Suse retail version. So, as I want to play mp3 on it.

For Amarok to play mp3, need to download and install mad and xine-mad and xmms-lib-mad for Xmms. Take note that I'm using x86 pc, so if you have a 64 bit, look for the particular x86_64 equivalent.

Go and play mp3!

Tuesday, March 07, 2006

SAMBA File Server - Quick how-to

The scenario: I have a Centos 4.2 PC that serves as file storage from 3 Windows XP client.

Assuming that samba server package has been already installed, and the only thing that we would like to do is to configure or edit the file /etc/samba/smb.conf.

A simple anonymous Samba File server

- Create a directory that everyuser has access into. Say.. shared is the directory to be created under /home, so the command would be "mkdir -m 777 /home/shared".

- Now we have to configure Samba for anon access, but first we have to back-up the original smb.conf file. Doing "mv /etc/samba/smb.conf /etc/samba/smb.conf.orig" will change the the file from smb.conf to smb.conf.orig. Then "vi /etc/samba/smb.conf" and enter the following below:

#/etc/samba/smb.conf
[global]
workgroup = homebox
netbios name = fileserver
server string = anonymous file server
security = share
browseable = yes
hosts allow = 192.168.1.

[share1]
path = /home/shared
comment = shared-folder
read only = No
guest ok = Yes

Now, to apply it in your network, just replace the workgroup entry to your existing workgroup and host allow entry. You might have different IP address on your existing PC.

Now check by the command "testparm", if configured correctly, there will be no errors, else, check the config or typo mistakes.

Check if samba-server runs on start-up, "chkconfig --list | grep smb"

smb 0:off 1:off 2:on 3:off 4:on 5:on 6:off

It shows that samba runs upon booting on init 3 and init 5, but if not, you can just issue the command "chkconfig --level 3 smb on" and upon booting to level 3, samba also start.

Or we can start the service manually, when as root, do the command "/etc/init.d/smb start"

Now, browse the Network Neighborhood on your windows XP and check if you can read/write on the shared folder on Samba Server.

Adding authentication to samba server

Edit /etc/samba/smb.conf and it sould be similar to the file below

#/etc/samba/smb.conf

[global]
workgroup = homebox
netbios name = fileserver
server string = file server
security = user
encrypt password = yes
browseable = yes
hosts allow = 192.168.1.

[share1]
path = /home/shared
comment = shared-folder
read only = No


Then create a samba user and password file, do the command as root:

# smbpasswd -a sambauser
New SMB password:
Retype new SMB password:
Added user sambauser.


Note: sambauser should exists as a regular user on the server, unless if you have a separate authentication server like that of NIS or LDAP.

Saturday, March 04, 2006

Linux, KDE, Kernel new release, oh!.. Its my Birthday today!!!

Happy Birthday to me!

Wow!, I'm 32 and still..., oh boy, at least Im still alive, healthy, already have a family, and of course, happy!. Though I'm not that successful in terms of career, at least now, those things that years and years ago ( am I that old?), I really just wonder how it works, I now know how to make them work... like Email, Web, Linux, NFS, TCPIP, VoIP, DNS Server, and a lot more that I did not learn in my old school. To tell you honestly ( to you who happened to visit this blog..) I only learned those things I mentioned thru my own research, testing, building my own test server, buying a domain just to know how to use it ( lol..), kind of funny huh.. having my own hardware, and reading lot's of ebooks (Thanks to amule.. hak hak hak!).

Well, up to now, even the company that I am working does not have that kind of program that enhance the skills of its employee, for almost three years working on them, they did'nt care... damn!, I have to update myself on anything related to my work, coz If you just wait on them, nahhh, I thinks its just the right thing for everyone to do, learn on yourself if you have that kind of chance, Internet and community forum really helps.

So again, HAPPY BIRTHDAY TO ME!

Monday, February 20, 2006

A quick how-to on installing Amavis Clamav and Spamassassin on Centos 4.2 with Postfix

A quick how-to on Amavis and clamav with spamassassin
  • On my box, I have a running postfix mail server, secured as not an open-relay
  • I am running centos 4.2


  • Adding DAG repo
To install amavis and clamav, we need to add dag repositories since the packages mentioned are not available on the centos base repositories.To do this, we have to create a file named /etc/yum.repos.d/dag.repo and have it contain the following lines:


[dag]
name=Dag-RHEL-Yum
baseurl=http://dag.linux.iastate.edu/dag/redhat/el$releasever/en/$basearch/dag
http://www.mirrorservice.org/sites/apt.sw.be/redhat/el$releasever/en/$basearch/dag
http://mirrors.ircam.fr/pub/dag/redhat/el$releasever/en/$basearch/dag
http://apt.sw.be/redhat/el$releasever/en/$basearch/dag
enabled=1
gpgcheck=1


Ok, after doing that, we need to import dag rpm-gpg-key with the command below:


rpm --import http://dag.wieers.com/packages/RPM-GPG-KEY.dag.txt


  • Now we are ready to install.
Do it as root with the command below.


yum install amavisd-new clamav clamd


and also

yum install perl-Archive-Tar.noarch


I dunno but it is supposed to be considered as dependency during install since if its not install, you will encounter problem on running "amavis debug"

  • After the installation:

Create a /var/log/amavis.log to be owned by amavis user and group with the command below.


touch /var/log/amavis.log && chown amavis.amavis /var/log/amavis.log


Next, we have to edit the file /etc/amavis.conf, then set the $domain and $hostname to our own value and then uncomment the following:


$forward_method = 'smtp:127.0.0.1:10025'; # where to forward checked mail
$notify_method = $forward_method; # where to submit notifications


Disable virus quarantines: change the value of $QUARANTINEDIR the line:

$QUARANTINEDIR = undef;


If we dont want our system to notify those senders that we did not accept their email attachement or we found out that their email has virus, uncomment the ff: below.


# $final_virus_destiny = D_DISCARD;
# $final_banned_destiny = D_BOUNCE;
# $final_spam_destiny = D_BOUNCE;
# $final_bad_header_destiny = D_PASS;


Next, find and uncomment the Clam AV section. Comment out all virus scanners you are not using:


### http://www.clamav.net/
['Clam Antivirus-clamd',
\&ask_daemon, ["CONTSCAN { }\n", "/var/run/clamav/clamd.ctl"],
qr/\bOK$/, qr/\bFOUND$/,
qr/^.*?: (?!Infected Archive)(.*) FOUND$/ ],


Make sure amavis is not currently running, do the command:


/etc/init.d/amavis stop


then do the command

amavis debug


( if you found error, then troubleshoot)

Start amavis now:


/etc/init.d/amavis start


Try to


telnet 127.0.0.1 10024


and you should get the response below showing that amavis has been running.


Trying 127.0.0.1...
Connected to 127.0.0.1.
Escape character is '^]'.
220 [127.0.0.1] ESMTP amavisd-new service ready


Next, configure Postfix to use Amavisd-new, which will now function as an SMTP proxy server. Add this to the end of /etc/postfix/master.cf:


smtp-amavis unix - - n - 2 smtp
-o smtp_data_done_timeout=1200
-o disable_dns_lookups=yes
127.0.0.1:10025 inet n - n - - smtpd
-o content_filter=
-o receive_override_options=no_unknown_recipient_checks,no_header_body_checks
-o local_recipient_maps=
-o relay_recipient_maps=
-o smtpd_restriction_classes=
-o smtpd_client_restrictions=
-o smtpd_helo_restrictions=
-o smtpd_sender_restrictions=
-o smtpd_recipient_restrictions=permit_mynetworks,reject
-o mynetworks=127.0.0.0/8
-o smtpd_authorized_xforward_hosts=127.0.0.0/8
-o strict_rfc821_envelopes=yes


Then add this line to /etc/postfix/main.cf:


content_filter = smtp-amavis:[127.0.0.1]:10024


then restart postfix by the command below:


/etc/init.d/postfix restart


Now open /etc/clamav.conf and /etc/amavisd.conf, and make sure that amavisd.conf references the LocalSocket file:


## /etc/clamav/clamav.conf
LocalSocket /var/run/clamav/clamd.ctl
----------------------------------------
## /etc/amavis/amavisd.conf
### http://www.clamav.net/
['Clam Antivirus-clamd',
\&ask_daemon, ["CONTSCAN { }\n", "/var/run/clamav/clamd.ctl"],
qr/\bOK$/, qr/\bFOUND$/,
qr/^.*?: (?!Infected Archive)(.*) FOUND$/ ],


Note:
It might happen that /var/run/clamav/clamd.ctl does not exist and when you will try to start clamd, it won't start since it did'nt find that file or does not have the right to create or use the file so we can do the command:


touch /var/run/clamav/clamd.ctl


and then


chown amavis.amavis /var/run/clamav/clamd.ctl


Now we need to change some lines on clamd.conf and freshclam.conf..see below:


#/etc/clamd.conf
User amavis #orig user is clamav


Also change some default settings below


# Path to a local socket file the daemon will listen on.
# Default: disabled
LocalSocket /var/run/clamav/clamd.sock
#note, the default is that LocaSocket was commented so have to uncomment it
#Below, the default is that TCPSocket has no comment so you have to comment it
#because if you forget to comment that line, when you restart Clamav, the error would be
#Starting Clam AntiVirus Daemon: ERROR: You can select one mode only (local/TCP).
# TCP port address.
# Default: disabled
#TCPSocket 3310


#/etc/freshclam
DatabaseOwner amavis #orig is clamav


Now try to chown some clamav folder to amavis.amavis


LogFile /var/log/clamav/clamav.log
PidFile /var/run/clamav/clamd.pid
DatabaseDirectory /var/clamav/


Finally, hunt down any files belonging to Clam AV in /etc/logrotate.d/.


For example:


/etc/logrotate.d/clamav
/etc/logrotate.d/freshclam


The filenames may vary. Inside each file, find this line:


create 640 clamav adm
Change it to:
create 640 clamav amavis


Save the changes and reload clamav and that's it! You can now check the maillog of by the command:


tail -f /var/log/maillog


You can also try to check if CLAMV anti-virus really functioning. Try to create a file in you name test.com ( do this inside your linux box ) paste the line of characters below without the quotes.


"X5O!P%@AP[4\PZX54(P^)7CC)7}$EICAR-STANDARD-ANTIVIRUS-TEST-FILE!$H+H* "


This is the eicar anti-virus test file. Email this file as attachement to the user on that box or from that box to outside and you will see messages something like below, saying that it did detected this file as a sort of infected file.

log file below:


Feb 20 10:24:22 pacland amavis[3786]: (03786-06) Blocked INFECTED
(Eicar-Test-Signature), <> -> , Message-ID:
<20060220022421.ga25880@test.net>, mail_id: qvSy9GYSCarX,
Hits: -, 614 ms
Feb 20 10:24:22 pacland postfix/smtp[25890]: C564C4A665:
to=, relay=127.0.0.1[127.0.0.1], delay=1,
status=sent (250 2.7.1 Ok, discarded, id=03786-06 - VIRUS: Eicar-Test-Signature)


If you find this in your log files, it means that the installation has been functioning well basically.

  • Installing and configuring spamassassin
On Centos, "yum install spamassassin.i386 or check if might be already installed. After the installation, edit /etc/amavis.conf

Uncomment and set


$final_spam_destiny = D_PASS; # (defaults to D_REJECT)


D_PASS allow the message to be delivered to the recipient and let the recipient decide what to do.
D_DISCARD will drop the message at smtp level, avoiding extra usage of bandwidth. Set the following:


$sa_tag_level_deflt = -999; # add spam info headers if at, or above that level
$sa_tag2_level_deflt = 5.0; # add 'spam detected' headers at that level
$sa_kill_level_deflt = -999; # triggers spam evasive actions
# string to prepend to Subject header field when message exceeds tag2 level
$sa_spam_subject_tag = '***SPAM*** ';


Then chown the spamassassin folders and files, as root, do the command.


chown -R amavis:amavis /usr/share/spamassassin


Now, to test your system if it really filters spam, at least basically, try to email a certain account on the host that has been installed with spamassassin with a message that contains "penis enlargement, viagra" and I'm sure it will be block as spam.

Then restart amavis-new


/etc/init.d/amavisd restart


check this out -/spamassassin autoconfigurator/-

---/CHEERS!/---

Thursday, February 16, 2006

Sending email from CLI on linux with attachment

Sending email from CLI on linux with attachment

Email clients to be used:


nail
email - http://email.cleancode.org/
mutt


These is a quick guide on how to send email via Linux CLI, with attachement and can be run as cron job.

On Mandriva:

Install nail


urpmi nail


Now, to send an email with attachment, the command will be


nail -s test -a file-to-be-attached.tar.gz user@email.com


where:
-s = subject
-a = attached file

or see manpage of nail for more commands man nail

After you hit the enter doing that command, it will wait for you to type a message and end with . (dot) so that it will execute and exit. It will not work when intended as cron jobs, so we have to change that command.. see below


echo "this is a little message" | nail -s test -a file-to-be-attached.tar.gz user@email.com


It will now send the email with attached file without prompting you to write a message.

Enabling to send email with attachment, we can write a little script and run it as cron job.

On Centos: ( I did not find a package "nail" on centos so the alternative, which also a good one is "email")

Download "email" from http://email.cleancode.org/?pid=download. Choose the right package for your distro, if RPM, download it then install:


rpm -ivh email.xxx.rp


then edit /etc/email.conf

send email with attched file with the command below


email -s "test" -b -f sendername -a file.tar.gz user@emailme.com


where:
-s = subject
-b = sending blank email
-f = sender's name
-a = attached file

Ohhh...! I realized that doing above with mutt is also possible, the command should be like below:


echo "this is a test" | mutt -a file-2-attach.tar.gz user-email@domain.tld -s my subject


Since mutt works, I dont need to install the mentioned package above.. email

Tuesday, January 17, 2006

Mysql, Courier-Imap and POP - make them listen to localhost

-MYSQL-

Edit the the file /etc/my.cnf and add "bind-address = 127.0.0.1" with out the quote, and will look like that below....


[mysqld]
datadir=/var/lib/mysql
socket=/var/lib/mysql/mysql.sock
# Default to using old password format for compatibility with mysql 3.x
# clients (those using the mysqlclient10 compatibility package).
old_passwords=1

bind-address = 127.0.0.1

[mysql.server]
user=mysql
basedir=/var/lib

[mysqld_safe]
err-log=/var/log/mysqld.log
pid-file=/var/run/mysqld/mysqld.pid


---------------------------


Courier-IMAP and POP3 with SSL

Edit the file that can be located @ /usr/lib/courier-imap/etc. Those files are, for IMAP, imapd and imapd-ssl, for POP3, pop3d and pop3d-ssl. Make sure to change the entry that contains
##NAME: ADDRESS:0
#
# Address to listen on, can be set to a single IP address.
#
ADDRESS=127.0.0.1

#ADDRESS=0

the default is ADDRESS=0, I just change 0 (zero) to 127.0.0.1 so that it is not accessible outside, do this only if you dont need your IMAP or POP3 server to be accessible from outside, so its applicable if you use a web based email client like that of squirrel mail, you can set it up this way for safety purposes...

Friday, January 13, 2006

Disabling ipv6 on Fedora core 4 new install


After installing FC4, I found out that when I do #/sbin/ifconfig, it shows that IPv6 has been enabled on any eth interface on my box... see below..


eth0 Link encap:Ethernet HWaddr 0D:60:97:6A:98:F4
inet addr:2xx.xx.xxx.xx2 Bcast:2xx.xx.xxx.xx3 Mask:255.255.255.0
inet6 addr: f580::290:97ft:faaa:f6d4/64 Scope:Link
UP BROADCAST RUNNING MULTICAST MTU:1500 Metric:1
RX packets:126557 errors:0 dropped:0 overruns:0 frame:0
TX packets:77565 errors:0 dropped:0 overruns:0 carrier:0
collisions:0 txqueuelen:1000
RX bytes:155429479 (148.2 MiB) TX bytes:5770590 (5.5 MiB)
Interrupt:10 Base address:0xdc00

eth1 Link encap:Ethernet HWaddr D0:81:42:86:GD:84
inet addr:192.168.0.4 Bcast:192.168.0.255 Mask:255.255.255.0
inet6 addr: fe88::201:25f:f883:cd74/64 Scope:Link
UP BROADCAST RUNNING MULTICAST MTU:1500 Metric:1
RX packets:21897 errors:6 dropped:0 overruns:1 frame:9
TX packets:146 errors:0 dropped:0 overruns:0 carrier:0
collisions:24 txqueuelen:1000
RX bytes:5363531 (5.1 MiB) TX bytes:9099 (8.8 KiB)
Interrupt:11 Base address:0xe000

lo Link encap:Local Loopback
inet addr:127.0.0.1 Mask:255.0.0.0
inet6 addr: ::1/128 Scope:Host
UP LOOPBACK RUNNING MTU:16436 Metric:1
RX packets:201 errors:0 dropped:0 overruns:0 frame:0
TX packets:201 errors:0 dropped:0 overruns:0 carrier:0
collisions:0 txqueuelen:0
RX bytes:52924 (51.6 KiB) TX bytes:52924 (51.6 KiB)


So, in order to disable it, I have to add the ff. on /etc/modprobe.conf file. [note: I found the Idea by googling]

alias net-pf-10 off
alias ipv6 off


and then I rebooted, and here's the new result of #/sbin/ifconfig

eth0 Link encap:Ethernet HWaddr 0D:60:97:6A:98:F4
inet addr:2xx.xx.xxx.xx2 Bcast:2xx.xx.xxx.xx3 Mask:255.255.255.0
UP BROADCAST RUNNING MULTICAST MTU:1500 Metric:1
RX packets:126557 errors:0 dropped:0 overruns:0 frame:0
TX packets:77565 errors:0 dropped:0 overruns:0 carrier:0
collisions:0 txqueuelen:1000
RX bytes:155429479 (148.2 MiB) TX bytes:5770590 (5.5 MiB)
Interrupt:10 Base address:0xdc00


The inet6 address has gone :)